The best gets better
by John Henshall
One computer application has had a more profound effect on photography than any other: Adobe Photoshop.
Photoshop made the word "darkroom" obsolete because digital imagers do it in "lightrooms". The facilities that Photoshop brings to the lightroom exceed those built up over more than a hundred and fifty years of chemical photography and revolutionise the ways we work with images.
Quite apart from its phenomenal imaging power, I have Photoshop to thank for converting me to the elegant productivity of the Apple Macintosh computer. To use Photoshop I had to buy a big Mac -- and I don't mean a silly burger. All those years ago, it took just fifteen minutes to unpack my new Mac and start working with Photoshop. Could it really be this easy? No 'config.sys' or 'autoexec.bat' files to edit. Word for Windows came on seven disks -- was it actually possible to fit a complex image editing program such as Adobe Photoshop on just one floppy disk? It was.
 Photoshop
1.0 was introduced in 1989 -- for the Mac only. Version 2.0
-- also Mac only -- came along in 1991. A year later,
version 2.5 appeared -- now for both Mac and Windows. Since
1992, you don't have to change computers: Photoshop runs
almost identically on either platform. The size of the basic
application has grown gradually with each new version. Now
at 9.9MB, it still comes on one disk -- though these days
that's a much more capacious CD-ROM. Some of this increased
size must be due to the long 'cast list' which scrolls up
the splash screen for a full two and a half minutes. But the
last name on the list will be worth waiting for -- if you
are a registered user of the software. It's a nice
touch.
Photoshop
1.0 was introduced in 1989 -- for the Mac only. Version 2.0
-- also Mac only -- came along in 1991. A year later,
version 2.5 appeared -- now for both Mac and Windows. Since
1992, you don't have to change computers: Photoshop runs
almost identically on either platform. The size of the basic
application has grown gradually with each new version. Now
at 9.9MB, it still comes on one disk -- though these days
that's a much more capacious CD-ROM. Some of this increased
size must be due to the long 'cast list' which scrolls up
the splash screen for a full two and a half minutes. But the
last name on the list will be worth waiting for -- if you
are a registered user of the software. It's a nice
touch.
Photoshop was never the only image editing software, though it quickly became the standard by which all others are judged. These days you shouldn't mess around with anything less. Although a complex application, it's easy to learn and apply its powerful functions a little at a time. This way, your skills will build into something potentially very profitable.
But no matter how good an application may be, there is always room for improvement. One of the major limitations of Photoshop has always been that there is only one level of undo.
MULTIPLE UNDO
 The
fear of ruining many hours of delicate photo editing can
easily stifle the creative juices. The remedy has always
been to save work often, using different filenames, but
multiple levels of undo have been missing -- until now. The
new History palette shows all the most recent changes to the
image in a chronological list with the name of the tool or
command used to modify the image. Any intermediate state of
the current work session may be returned to by clicking on
it. Photoshop 5.0 can do this because it retains all the
intermediate stages in memory, so these impose a heavy
demand on scratch disc space.
The
fear of ruining many hours of delicate photo editing can
easily stifle the creative juices. The remedy has always
been to save work often, using different filenames, but
multiple levels of undo have been missing -- until now. The
new History palette shows all the most recent changes to the
image in a chronological list with the name of the tool or
command used to modify the image. Any intermediate state of
the current work session may be returned to by clicking on
it. Photoshop 5.0 can do this because it retains all the
intermediate stages in memory, so these impose a heavy
demand on scratch disc space.
 Photoshop
5.0 supports up to four scratch discs -- Photoshop 4 allowed
just two. You should add a capacious extra hard drive to
your upgrade budget, for you'll undoubtedly need one to
store all the levels of undo and avoid the irritating
'Scratch Disks Full' message. Fortunately, high capacity
drives are now quite low in price. The maximum number of
history states, before Photoshop starts to delete the oldest
of them, may be set in the History Options menu. The default
is twenty, the
Photoshop
5.0 supports up to four scratch discs -- Photoshop 4 allowed
just two. You should add a capacious extra hard drive to
your upgrade budget, for you'll undoubtedly need one to
store all the levels of undo and avoid the irritating
'Scratch Disks Full' message. Fortunately, high capacity
drives are now quite low in price. The maximum number of
history states, before Photoshop starts to delete the oldest
of them, may be set in the History Options menu. The default
is twenty, the  maximum
one hundred. Repeated uses of, for example, the Rubber Stamp
tool are each recorded as separate states, so the maximum
could be reached very quickly. It's impossible to tell one
rubber stamp action from another when all the names are the
same but you can save a Snapshot of any stage and give it
any name you like. These Snapshots are stored at the top of
the History palette, complete with their thumbnail images.
Different stages can be compared easily by selecting the
relevant thumbnail.
maximum
one hundred. Repeated uses of, for example, the Rubber Stamp
tool are each recorded as separate states, so the maximum
could be reached very quickly. It's impossible to tell one
rubber stamp action from another when all the names are the
same but you can save a Snapshot of any stage and give it
any name you like. These Snapshots are stored at the top of
the History palette, complete with their thumbnail images.
Different stages can be compared easily by selecting the
relevant thumbnail.
Any time you are happy with your work so far, you can free the memory used by the History palette by selecting Edit > Purge > Histories. You lose the undos but regain memory or scratch disc space -- a particularly useful get-out when the 'Scratch Disks Full' message is encountered.
Saving the image does not save the History palette or Snapshots. The only way to save multiple image states is as separate files. When you reopen the original file, also reopen the other states and drag their Snapshots to the original image, where they can be accessed from the original image's History palette.
Photoshop 5.0's toolbox is largely unchanged from version 4 -- except for a few improvements. The History Brush Tool, which enables you brush one state into another, is new. Suppose you sharpen the whole image, then undo the sharpen state. Using the History Brush, the sharpen effect can then be applied selectively to areas of the image. This can be done with any of the actions you can perform on the image.
COLOUR MANAGEMENT
Scanners, monitor and printers handle colour completely differently. Scanners sample images in RGB, monitors display these data on phosphorescent cathode ray tubes and printers deposit it as CMYK ink or dye on paper. None of them share the same colour gamut. Worse still, no two scanners, monitors or printers are the same, so trying to predict acceptable colour is a nightmare.
 Photoshop
has changed the way it handles colour to bring it into line
with the new ICC (International Color Consortium) profiles.
This should mean colour consistency over all devices. The
trouble is, it's fraught with dangers. One of the first
places I looked was under File > Color Settings > RGB
Setup, where I found that Photoshop 5.0 had set itself up
under its new sRGB default for a monitor gamma of 2.2 (my
monitor is actually about 1.8), a white point of D65
(6500°K) and HDTV (CCIR709) 'Primaries'. HDTV is 16x9
aspect ratio, 1125 or 1250 line, television.
Photoshop
has changed the way it handles colour to bring it into line
with the new ICC (International Color Consortium) profiles.
This should mean colour consistency over all devices. The
trouble is, it's fraught with dangers. One of the first
places I looked was under File > Color Settings > RGB
Setup, where I found that Photoshop 5.0 had set itself up
under its new sRGB default for a monitor gamma of 2.2 (my
monitor is actually about 1.8), a white point of D65
(6500°K) and HDTV (CCIR709) 'Primaries'. HDTV is 16x9
aspect ratio, 1125 or 1250 line, television.
It is interesting to note that photographers have always had a colour management system. The act of handing over the transparency to the client is in itself a form of colour management -- in effect the photographer is saying, "This is the way I see and record your product. Now you take it to repro and make sure it still looks like this."
Previous versions of Photoshop have not been particularly good at making colour separations. I've been providing my own colour separations for this and other magazines for many years now and it wasn't a particularly pleasant experience getting things right. In fact the only enjoyable part was sharing the learning curve with trail-blazer David Kilpatrick. We held our breath as we first went direct to press from digital camera files in the September 1991 issue. I've seen more disasters when people have started using colour management systems than when they've used an empirical approach. There are too many variables, so mistakes are a virtual certainty, and too little informed advice. So, on the basis of "if it ain't broke, don't fix it," I'm sceptical and reluctant to change until I've looked at it all far more closely.
MAGNETIC TOOLS
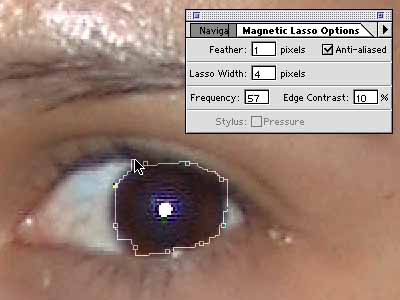
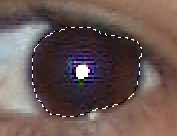
Selecting areas of an image easily, quickly and accurately has always been somewhat difficult. Most beginners like the relative simplicity of the Lasso tool to draw round the area to be selected while holding down the mouse button but you need a steady hand or a drawing tablet, or both, to make accurate selections this way. Improvements to the Lasso tool make such selections much easier. The new Magnetic Lasso tool recognises contrast or colour boundaries and snaps to them automatically. It's very useful for selecting objects easily.
Similar major improvements have been applied to the Pen tool. The new Magnetic Pen tool is used like the Magnetic Lasso but creates an editable Bézier path which follows the edge of the object. A further variation of the Pen tool is the Freeform Pen, which is used like the Lasso tool to enable the quick sketching of paths around objects.
MEASURING UP
The ability to correct perspective in Photoshop is a powerful tool, though it is one which has required a considerable amount of guesswork to get the angles right. The new Measure tool now makes it possible to compare angles in an image and to measure distance between two points in the image -- a big help in creating precise layouts.
 The
Color Sampler is an extension to the Eyedropper Tool which
enables up to four points on the image to be selected and
saved. I've selected a flesh tone (#1), highlight (#2) and
shadow area (#3) in the example. The Color Sampler tool is
shown currently measuring an area on the image shown at the
top left of the Info palette. This is a useful new feature
which enables you to save and refer to these chosen points
as you work and make adjustments.
The
Color Sampler is an extension to the Eyedropper Tool which
enables up to four points on the image to be selected and
saved. I've selected a flesh tone (#1), highlight (#2) and
shadow area (#3) in the example. The Color Sampler tool is
shown currently measuring an area on the image shown at the
top left of the Info palette. This is a useful new feature
which enables you to save and refer to these chosen points
as you work and make adjustments.
ADDING TEXT
There have always been limitations in the way that Photoshop handles text. It's been possible to position text, floating on a layer above the image, but when the position has been decided upon -- that's it, fixed forever in the pixel structure of the image. In version 5.0, type is treated as vectors and may be manipulated with complete flexibility, the way designers and typographers prefer. Using the Preview option, type now appears 'live' over the image as you type into the box. It now remains as vectors -- editable and able to enjoy character-level formatting such as tracking, kerning and leading. It even remains editable after effects have been applied to the Type layer. For the first time, fonts and sizes can be mixed within the same block. The name of each Type layer automatically takes up the first part of the text it contains, making identification of layers much easier. Maybe the next version could extend this idea, to incorporate settings for such things as Unsharp Mask or Gaussian Blur in the History pallet?)
SYSTEM REQUIREMENTS
Adobe Photoshop 5.0 requires a Macintosh computer with PowerPC processor running MacOS 7.5.5 or greater, 32MB RAM, 60MB of hard disc space and a CD-ROM drive. For Windows 95 or Windows NT 4.0 a PC with Pentium processor, 32MB RAM, 60MB of hard disc space and a CD-ROM drive. Systems with multiprocessors and MMX technology will give improved performance. A large capacity hard drive and 64MB of RAM are recommended for both Mac and PC.
UK PRICES
Adobe Photoshop 5.0 is available now at a street price of around £600. Existing registered users of Photoshop can upgrade for £165 plus VAT. Registered users of any LE version (typically supplied bundled with scanners) may upgrade for £205 plus VAT.
IN CONCLUSION
Consider all the person hours which have gone into writing and upgrading this fantastic imaging application. Whatever option you go for, Photoshop 5.0 is very good value and its increased productivity makes this upgrade a must. Buy it now.
This article first appeared as "John Henshall's Chip Shop" in "The Photographer" magazine, June 1998.
IMPORTANT NOTICE
This document is Copyright © 1998 John Henshall. All rights reserved.
This material may only be downloaded for personal non-commercial use. Please safeguard the future of online publishing by respecting this copyright and the rights of all other authors of material on the Internet.
![]()
![]()