CORRECTING EXPOSURE
Salvage your lost shots
by John Henshall
'Bracketing' exposures probably helps sell more film than any other photographic technique yet. let's be honest, there still are times when we lose shots because of incorrect exposure.
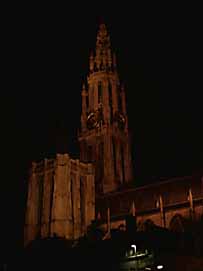
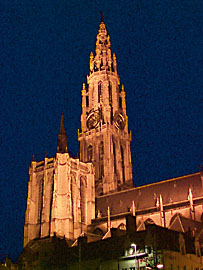
Original image...and after Photoshop
When I took this snap of Antwerp Cathedral, in Belgium, using a Minolta RD-175 digital camera, I guessed the exposure - 1/15th at wide open - based on how long I reckoned I could hand-hold the camera without shake. The resulting picture is about two -stops under exposed. On the face of it, it's a lost shot. But what tricks could the Lightroom come up with? Is it possible that Adobe Photoshop could provide some image intensification to help me get a useable shot out of this disaster?
Photoshop has a useful feature called 'Levels' which tells us quite a lot about an image. To see what 'Levels' can offer, open an image in Photoshop and select Image>Adjust>Levels from the Menu Bar. Note the shortcut, Command+L. This presents you with a dialogue box containing a histogram showing a graphical representation of the tones in your image.
An average image would show a good distribution between the shadow areas (on left of the graph) and highlights (on the right of the graph). A histogram for a light image would show a bias towards the right of the graph, a dark image would show a bias towards the left of the graph. Highlights and specular content in a dark image would still give some pixels at the right of the graph.
Opening my image of Antwerp Cathedral and selecting levels gives a histogram very biased towards the left. There is a very sharp cutoff at the left, showing that most of the shadows are crushed to black. No highlight even approaches the mid tone value. This is the graphical representation of my disaster. It might be asking a bit too much of Photoshop's Lightroom magic to ask it to save this shot but let's give it a whirl to see how far we can push it.
Here's How We Did it - Step-by-Step
1. Instant preview
First click the 'Preview' check box so that whatever changes we decide to try will be seen immediately on our monitor.
2. Increasing highlights
Next stretch out such meagre tones that we have to intensify the image - to push it a couple of stops. This is achieved by clicking on the right hand marker, just below the histogram, and sliding it to the left until it is just underneath the highest tonal value shown on the histogram. Wow! The effect is immediate.
3. Changing gamma
To increase shadow detail still further, we also slide the mid tone marker to the left. This has the effect of stretching the tones in the shadow areas of the image - changing the gamma - while leaving the very highest and lowest tones at the points at which we have set them.
4. Go for it!
Click 'OK' and the selections we have previewed are applied to our image. Want to try other settings? Select Edit>Undo (Command+Z) and you are back to the original. To redo the changes, select Edit>Redo (also Command+Z - this toggles between 'Undo' and 'Redo') and there they are again. Save your work. Job done.
Just before we move on, take a last look at the histogram of this image after the remedial work. There are now fewer than a hundred different tonal levels, with considerable gaps between them, especially in the shadow areas, though these steps are not apparent in the final image.
Photoshop has now helped you make the most of the information hiding away in that murky shot.